Grey Area

I think I’m ready to retire my paintbrush! Painting is one of my least favorite tasks, but I persevered and now have a MUCH happier bathroom for it. Check out this teal-to-grey comparison!

Bold “Before”!

Neutral and airy “After”!

Bonus- I even replaced our old clunky medicine cabinet with a simple white framed mirror!

To this:

I’m sure you can see I’ve got a few areas to touch up near the light above the mirror and around the trim. I just couldn’t wait to share the relief. I’ve wanted to tackle that for awhile now! We’re so happy with the color (Silver Sateen from Behr). Of course, it’s not a project if you don’t run across a few problems (or maybe that’s just us?).

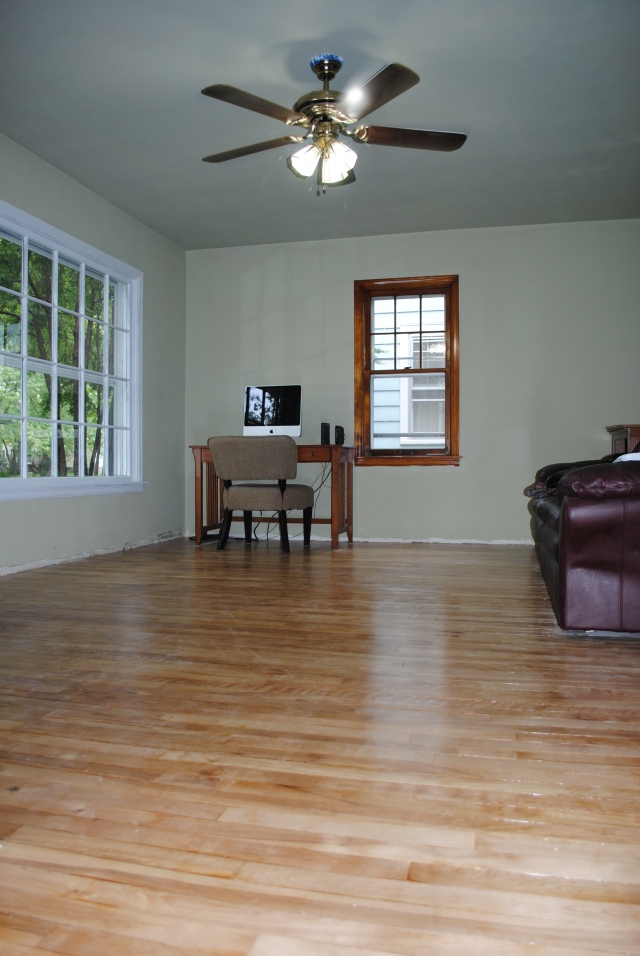
I don’t know if any of you have noticed, but some of the pictures in the floor refinishing post and then a few others from when I hung some white frames, you’ll see our giant living room window is all white trim, while the other window is, well, wood. Sigh. I’m slowly working my way around the house repainting/spraying all the window trim white (something I’ve always wanted in my home). I figured I would take the opportunity to do this in the bathroom while the room would be a hot mess for a bit. I went out and bought a few cans of semi-gloss spray paint, while patting myself on the back for my foresight- ‘…because the bathroom gets wet!’ I told myself.

Next, I taped off all the window panes. Instead of wasting painter’s tape by taping off the whole pane, I always cut down a garbage bag to the size I need and tape it to the window. Works great! If you don’t want to waste garbage bags, you could use old newspaper, cardboard, junk mail… be creative! I normally would tape off around the window too, but since we were repainting, and it was only white spray paint, I chose not to. Then, I went crazy with the spray paint. It started off great, covering the window frame easily. Then I noticed that some areas started to “vein up” or “crack”.

At first, I thought it was due to water damage. But it could very well be that I skipped an amazingly important step in the process of painting. SANDING. I was applying a gloss to an already glossy surface. D’oh! So, I waited for it to dry and then lightly sanded over the surface and touched it up the next day. If I were to redo this, I probably would have used a self-leveling paint and worked with a brush instead of spray paint.

It still looks pretty awesome though. I love white windows! While this window was in-the-making, we were also priming the walls up in preparation for our grey paint.

Look at my man work!

Looks like tossed salad in there! Here comes the grey paint!

Seriously, who doesn’t write messages on the walls while they’re painting? Bueller? Bueller?

Almost done! Here’s the “after” photo to save you from scrolling.

And… we did it. High fives all around! But don’t get too comfortable with it! It’s progress, but we’ve got a long to-do list in there before it’s “done”, including:

  • Priming and repainting
  • Replace the bathroom mirror
  • Touch up unpainted areas in the bathroom
  • Get new window hardware (handle and lock)
  • New shower curtain/accessories
  • Replace trim
  • Get new lighting
  • Get new fan
  • Recaulk some areas in tub
  • New flooring (any suggestions?)
  • Get rid of yellow tub surround
  • Tile the surround
  • Replace tub?
  • New shower head and hardware
  • Replace cabinet with open storage

The current cabinet in the bathroom looks like this, and is immediately to the left when you walk in (before the sink).

It’s a problem because the drawers are hard to pull in and out. Also the placement isn’t fantastic, being an inch away to the bathroom door and all. It feels very cramped, and gets frustrating when you are trying to pull your hairdryer out of a stuck drawer at 6 a.m. I’d like to take off all the doors and build/drywall some shelves in there for a more open vibe. An inspiration photo, you ask? I’d be happy to oblige!

I’m loving that shelf off to the left of the photo! AND the amazing sink! From the Style Files.

This is very classy as well. Compliments of Apartment Therapy. Well people, I’ll be back soon with a story behind the bathroom mirror. Can’t wait to share!

Best,

Char

A Revived Kitchen Corner

Pictured below is our once dark and dingy kitchen corner:

Gives me the shivers just looking at it! But with some hard work and vision, we are very excited to share the new and improved result:

Isn’t that one heck of a difference?! If you are thinking ‘Boo- the black wasn’t that bad…’ let me tell you a brief story: Before we started unpacking all of our stuff into the kitchen, we took some time to clean out all the cupboards, sweep the floors, and wipe down the countertops. I just sprayed a paper towel with cleaner and was absent-mindedly rubbing down the black counter… and then I glanced at the rag before tossing it out. It was pure black. Gasp. I swear, I almost halted the move-in so we could do the countertop project right then and there – but Kevin convinced me otherwise. We just ended up avoiding that part of the kitchen like the plague that it was. We didn’t put our food near it and we washed our hands after getting to close to it. And finally, we got a game plan together to tackle it on Labor Day weekend.

It was quite the task, coming up with ideas on how to cover up / replace the problem corner. You see, we have future plans for a complete kitchen remodel and we didn’t want to invest too much into this temporary fix. I thought of buying contact paper to stick down and at least feel safe while making a sandwich. Kevin thought we could buy scrap slabs of countertop from the ReStore or a hardware store- but I wasn’t a fan of having to resize potentially super thick laminate. We considered moving up the kitchen remodel to this fall/winter, but in the end it just wasn’t in the budget. So, one afternoon we were walking through Menards, a big hardware store in our area. I pulled Kevin towards the kitchen department (a super bad habit of mine) and we found ourselves near the scrap laminate in the back of the store. While browsing and mulling over our kitchen ideas, we saw it. Just what we were looking for! Laminate sheets! There was an entire wall of super thin laminate surfaces to choose from. We instantly knew it was right for us. We ended up going with the color “natural limestone” and nabbed a 120″ x 40″ sheet of it for the low price of $33.

The next day we began the project. It’s a messy job, removing old countertop. Ours was a rubbery texture that smelled. I have no idea what they used to glue it down to the wood slabs underneath, but it was sure stuck. We used a couple of metal scrapers to remove the stubborn bits of countertop.

See how the previous owners must have just rolled that rubbery surface all the way up the wall as a makeshift backsplash? That’s so different!

It took the better part of the day…

…but we finally finished! Well, almost. See how the counter is made of wood slats with massive cracks in them? Any little piece of dirt (or adhesive) can just fall into the drawers below them. So we sealed them up with caulk.

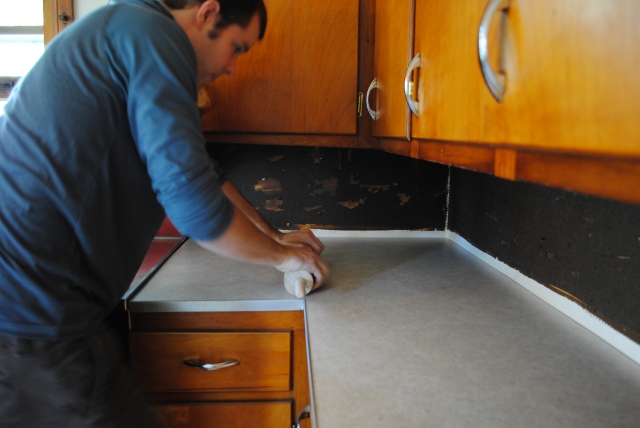
I spread the caulk with my finger to create a smooth, even surface so that when we laid down the laminate, we wouldn’t have a problem with everything looking uneven. Then we let it dry overnight.

With the motto “Measure twice, cut once” chanting in our heads, we carefully outlined the shapes we needed from the laminate and scored them with a heavy duty box cutter. I used a straight edge while scoring to keep the edges as nice-looking as possible, but it definitely wasn’t perfect. Then we snapped the pieces out as carefully as we could. The sheet wasn’t quite big enough to just cut one giant shape out, so we had to make two rectangular shapes. Most countertops hide the seam of two pieces coming together with a diagonal cut from the corner of the wall to the corner of the countertop, like this:

Our cuts look like this.

The main reason for this was because we had a hunch that our scoring and snapping method might not yield perfect results, so we cut the laminate in a way that two perfectly straight factory cuts would butt against each other to form a nice seam. Good thing we thought ahead!

Next, we started the installation. Using a foam roller, we applied contact cement to the wood slats and the underside of the laminate. Once it was tacky, we stuck the two pieces together and used a rolling pin (not the “official” tool of professionals, but it works) to keep pressure on the two pieces, which gives it a strong bond.

And then we heaved a sigh of relief. New countertops for the win!

Okay. After a long discussion about backsplash options with Kevin including wallpaper, real tile, faux laminate tile flooring (I won’t say who suggested that) I finally blurted “Beadboard!” and Kevin said “Yes!” and we ran to Home Depot.

And it just fit in the car. We originally bought two sheets of it at $10 a pop, but we ended up returning one that we didn’t use.

Then… we called a couple professional do-it-yourselfers. My dad and my Uncle Paul. A huge shout-out to these two awesome fellas for making this project work. Couldn’t have done it without you! They brought over a table saw and a jig saw and showed us a thing or two about making a kitchen pretty. They helped size the beadboard and make the right cuts for light switches.

Once we had the beadboard cut and ready to go, I used some glossy white spray paint to finish the look I wanted. I always like to be able to wipe things down quickly and easily. Glossy paint is usually the right choice for anyone who feels the same way.

Once it was all dried and ready to use, we nailed it into the wall and got some quarter round (3 pieces at $2 a pop). Kevin used a borrowed chop saw to make cuts at 45 degrees.

The last thing to do was drill some pilot holes in the quarter round, since they were too thick to pound through.

So with the $33 laminate counter, the $10 beadboard, and $6 quarter round… We came out to just under $50 for a brand new look int the kitchen, plus the added bonus of feeling safe enough to make food in my own kitchen… I couldn’t be more psyched.

What little kitchen updates are you all up to that help make your house a little more you? New salt and pepper shakers? Replacing old cabinet handles? Let me know!

Best,

Char


Picture This!

Something I never felt 100% comfortable with while apartment dwelling: hanging pictures. What do you guys think? For one thing, loudly hammering into the wall would surely not gain many neighbor-friends. And then there’s the security deposit to think about (sure you can spackle the holes up, but won’t that detail-oriented landlord notice?). It was a real shame, considering our apartment in Neenah had awesome high ceilings and tons of wall space. Now that I can paint, pound nails, and change things up to my hearts content… I plan to. A lot. That’s why when I saw these bright white frames on clearance, I just had to bite.

I ended up buying two of the $4.98 frames (which fit an 8 x 10 photo if you keep the matting) and two coordinating frames, sized 5 x 7 at $2.99 a pop. Since I was at Target, I decided to print two 8 x 10’s and two 5×7 pictures to complete the project. The grand total was under $25 with my Target discount. Big whoop! The first thing I did was remove the frames from their packaging and set them safely off to the side. I used the packaging (which was the same size as the  frames) to tape to the wall as an idea of how the pictures would look after they were hung.

We waited a few days with the packaging hanging like that, making small adjustments every now and then. We wanted to get a good idea of how to position the frames, without actually putting nails in the wall. Once they were just right, I took advantage of some afternoon free time and pounded a few holes and hung them up.

I was pretty much satisfied with the way they looked, until Kevin came home, took out his toolbox, and used a level on them. He pointed out that the one on the left was about a 1/4″ lower than the rest of the frames. For the record, I still don’t notice anything being off. However, for the sake of doing things correctly, we took them off the wall and patched the holes and carefully hung them back up. That boy is just so meticulous. 🙂

So, here’s the idea. I’d like to continue adding to the frames on the the right side of the window, and balance the look with a waist-height side table and a big round or oval mirror where the computer is (we are moving it to the spare bedroom for the time being). Here’s an inspiration photo via Pinterest (the original link to the photo is broken!):

One day, my style will be as awesome as this. One day…

Coming soon: we are just about finished with a mini-kitchen project. We replaced some countertop and some backsplash and I CANNOT WAIT to share it with you guys! Stay posted!

Best,

Char
PS- What projects (big or small) are you working on to liven up the space in your place?