Something for Nothing: Cleaning Checklist

As a nod to my goal of pumping out a weekly freebie for you guys, this week I designed a cleaning checklist of sorts. I know there are quite a few of these out there, but I wanted to create one that worked for me and my cleaning habits. I’m not one to make sure every Tuesday the toilet gets scrubbed down, or vacuum the floors three times a week. So I went with this “less accountable” approach. I just jot down a few tasks that need to get done sometime soon and tackle them as my schedule allows. Easy-breezy.

DSC1322

It’s an 8.5″ x 11″ sheet, so no crop marks or cutting required! My favorite kind of printable.

DSC1325

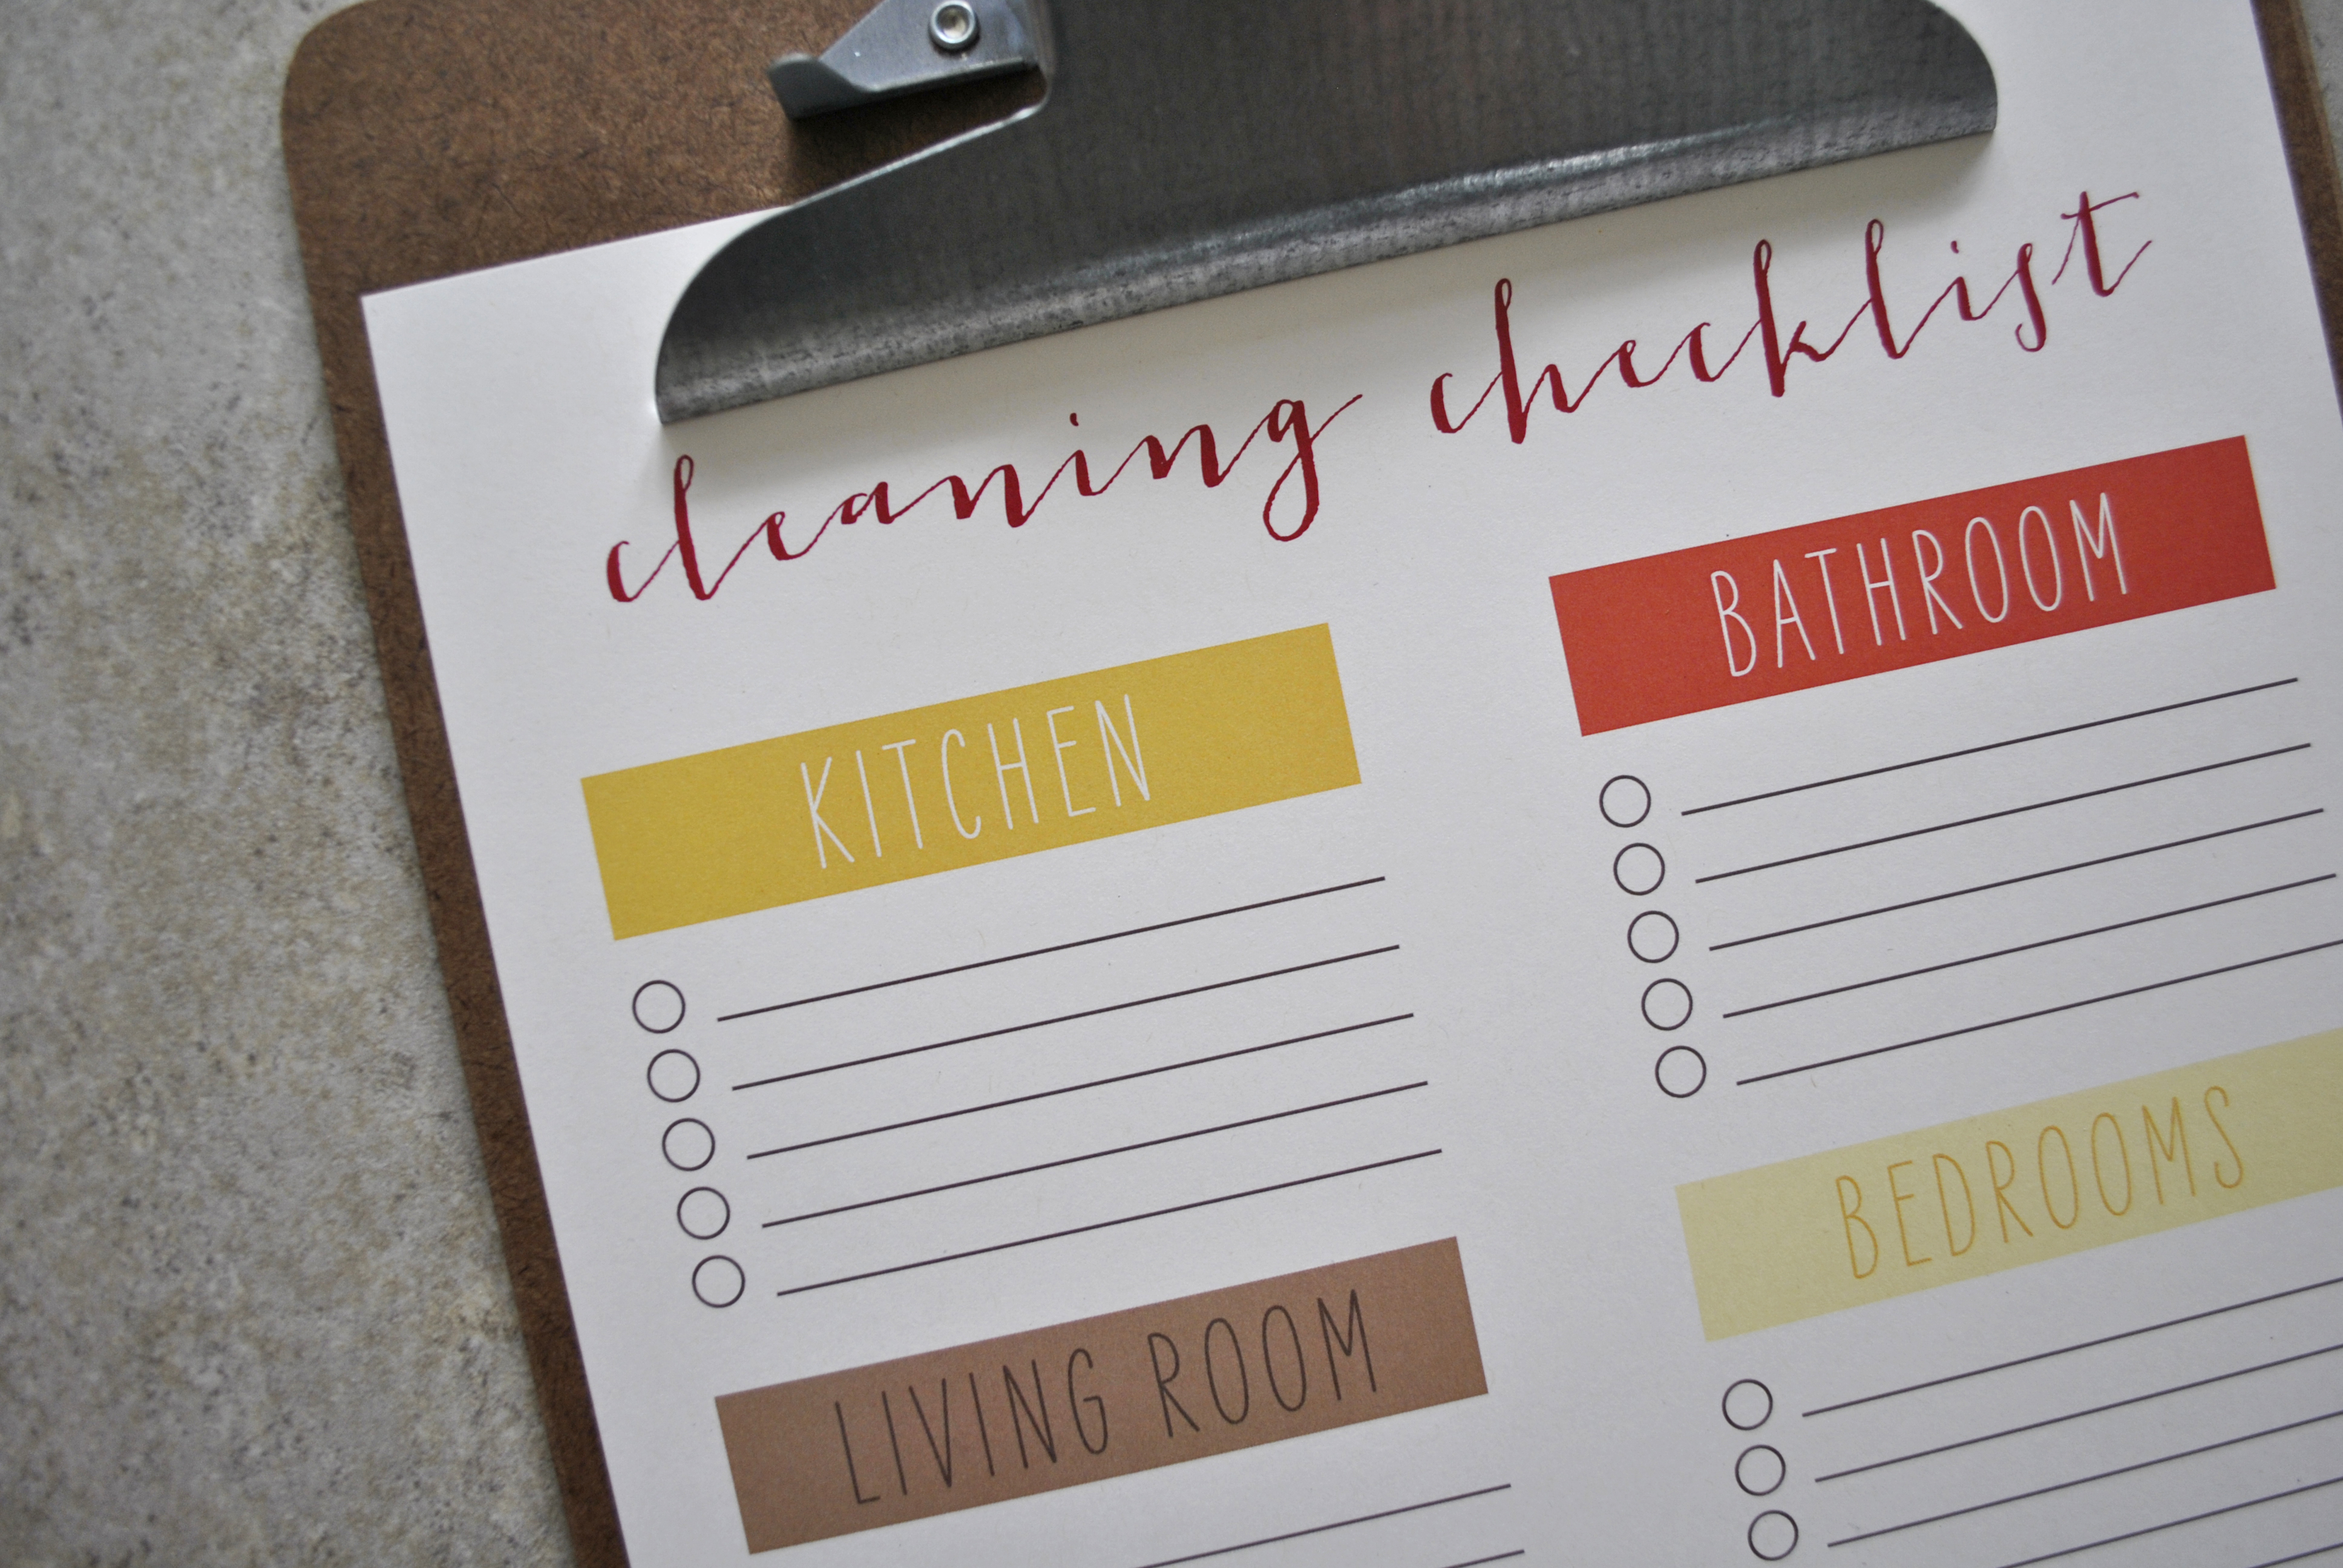
I’m hoping it will help me stay on top my spring cleaning this year.

DSC1329

The color inspiration was from my all-time favorite swatch source, a site called Design-Seeds. It was this picture to be precise:

GeodeBrights

Geode Brights, love those colors! I always tweak them just a bit to get exactly what I’m looking for. I think they are nice and spring-y. Here’s the cleaning checklist file for you, it’s a PDF. Hope you enjoy as much as I do!

Cleaning Checklist

26 before 27

Earlier this month, I turned 26. I am officially closer to 30 than 20. Some days I don’t even think I’ve crossed the threshold to my twenties, and yet here they are- half over. Sob. Only joking, I’ve never had anything against aging. It has a certain beauty. I did want to do something special to mark the occasion here in blog-land. I got the idea from another blogger to create a list of goals equal to your age before your next birthday. 26 things seem like a lot. And I’m sure this next year is going to a roller coaster ride of emotion and learning curves. We’ll see what happens. Here’s the list:


1. Find 5 new meals Kevin and I like.

2. Get better at using my Nikon camera.

3. Can/jar my own fruits, veggies and jams… Um, what else can be canned?

4. Make a raised garden bed.

5. Learn how to make delicious fried rice. Like at Katsuya or Nakashima’s (our best japanese cuisine restaurants). Drool.

6. Make 50 new items for my Etsy shop.

7. Make a “freebie weekly” for the blog. Like this one and this one.

8. Create a better layout/system for the hall closet.

9. Work on my calligraphy.

10. Tile the kitchen backsplash.

11. Make going our local farmer’s market a habit on Saturday mornings this summer.

12. Get back to (or below!) my pre-pregnancy weight/image.

13. Read the entire New Testament.

14. DIY some of our Christmas gifts.

15. Find groups/activities on the cheap for Baby Kelly and me.

16. Make a frame wall.

17. DIY some wall art

18. Take monthly nature photos and create a calendar from them.

19. Make a successful cheesecake!

20. Expand on my vocabulary/sentence structure skills.

21. Make my own baby food/recipes.

22. Go disc-golfing with Kevin and Baby Kelly at least once.

23. Learn to make a good-looking fishtail braid.

24. Organize and backup all of my photos on the computer. A daunting task.

25. Get better at recognizing an artist’s voice on the radio. #tonedeaf

26. Start learning French.


So that’s it. I’ll keep you updated on what get’s crossed off the list.  Wish me luck to finish it all before my 27th birthday! Ahh!

October

I haven’t been out much this October, while I usually enjoy kicking up leaf piles and soaking up as much outdoors time as possible. I shudder just thinking of those long, cold months ahead. However, I did get out at least once. I took some engagement photos for some friends at a local nature center. This beauty is one of my favorite in the bunch.

october

Enjoy your autumn, wherever it finds you!

Accent Table

Awhile back, I found an accent table I liked at Target. It was a bit dark for my taste, but I needed something that would spruce up a corner in our living room. So I sprung on this dark wood, modern table and added accessories over time:

Accent Table

Looks decent, but it was just sucking up tons of natural light that we couldn’t afford to lose. I decided to play around a little bit.

DSC_2686

I took of the front drawers and unscrewed the hardware. Oh, I should mention that my FIRST attempt to lighten this piece was to spray the hardware gold, to match some various accents on the table already (like the picture frame, the vase and the mirror). And it was a good attempt, but it wasn’t enough!

DSC_2687

I brought the two drawers to the garage and used 60 grit sandpaper on a palm sander to get the darkness off. Then I went over that with 150 grit. I would have used 3 different grits and ended with a higher (like 180 grit) finish, but I felt that it was sufficiently smooth with what I had available. Once it was sanded I used odorless mineral spirits and rag to wipe off the dust and debris leftover on the drawer front. 

DSC_2693

DSC_2692

Once the drawer fronts had “dried” (the wet look that the mineral spirits left) it was time for primer and paint. I usually use Kilz Primer. We pick up a big bucket at Home Depot whenever we’re low. Then I went over it with Behr Ultra Pure White in a semi-gloss finish (which was left over from another project). I trial-ed a foam roller this time around while painting, and I must say: I will never go back! They are perfect for a smooth surface. Probably would have looked even more amazing with self-leveling paint. Next time…

DSC_2695

DSC_2696

DSC_2697

I popped the hardware back on after everything had dried nicely. And I’m VERY happy with the results.

DSC_2720

DSC_2723

It’s like a brand new piece of furniture! Very awesome DIY for cheap. What is everyone else working on? Anyone updating with paint?

Pear-ific

This weekend was full of family, friends and pears! My parents recently moved to a new home, and in the backyard, they have a very fruitful pear tree. So what do you do with hundreds of pears and a lazy Saturday afternoon? Start canning of course!

002

003

001

006

016

That’s the family and the process, here’s some of my photos from the pear tree.

3

1

Love me some scarred, character-filled fruit!

2

4

Yes, I was pretty much that close to the bees. Did I mention I want to be a photographer when I grow up?

Something for Nothing: Sympathy Card

In light of recent events, I was compelled to design a card for those suffering a loss or are recovering. Check out the bottom of this post for your free printable!

believeimage

It’s a card to give to friends, relatives or someone close to you. Ideal uses would be for those in grief, pain, sickness, or are suffering a loss. The outside says “Believing, Trusting, Hoping, Praying” and the inside is blank. I always find that a personal, handwritten message means much more to someone in pain. Even if you feel like you’re not good at writing something personal. Something short and sweet is always good to hear, like  “I can’t wait to see you back on your feet” or “I miss our conversations!”. Maybe even jot down what you are hoping for or a quick prayer.

DSC_2601

This card is to be printed on 8.5″ x 11″ paper and has the crop marks to trim it down to the correct size of 10″ x 7″. Once you have your 10″ x 7″ card cut out, use a scoring pad to create a fold mark down the middle, right at 5″, like pictured. You could also fold this by hand.

DSC_2604

And now you should have yourself a nice, folded sympathy card! As for the color inspiration of this card, I found an image at the website “design-seeds” called milk tones (pictured below). I always tweak the colors a bit to work for me, and that’s how I ended up with gray, wavy oval and fun dotted “confetti” border.

MilkTones

Here’s the free sympathy card printable link:

Sympathy Card

Hope you enjoy it! Feel free to tell me how you’re using it!

Tough.


DSC_2598

This week has been tough. My dad was in a car accident this past weekend that landed him in the ICU. He is on the mend, but his injuries are pretty severe. We are optimistic that he will make a full recovery in the coming months, but there are a few struggles in the now. Above is a picture of my dad and I on my wedding day. We all truly love him, and your support and prayers are appreciated. Thanks all!

Vase Painting

I stopped into Goodwill the other day and picked up a few of these beauties from the glass department.

DSC_0238

I think it was about $3 or $4 for all four jars. This chic, feather-patterned guy is my favorite.

DSC_0241

The intention was to follow this tutorial on how to make some fancy/modern decorations at home for cheap. I’m thrifty like that. I used paint we had in the basement and also picked up a $3 sample pot of Behr’s paint at Home Depot.

DSC_0243

Basically, you pour the paint down the INSIDE wall of the jars and rotate them (mouth of the vase up!) until the inside is completely covered. Then you can flip them mouth-side-down onto old newspaper. They take a while to dry, but I’m loving the result!

DSC_0253

They are not quite as “pastel” in person, that’s probably a camera flaw. I’ve already set them on display on my little accent table of the living room. I’m constantly futzing over what should sit on that thing. It changes weekly. And I’m actually thinking of sanding the drawers down and painting them white for a little pop of brightness in that little corner.

DSC_0264

Oh yeah, I finished one of my designs! It’s a personalized family print. Here’s a closer shot:

DSC_0265

It makes me happy… Any paint-related projects going on out there in the world? Tell me about them! Or link to them! I’d love to see your DIY projects.

Outdoor Updates

Unfortunately, they deemed our little hub here in Wisconsin “Tree City, USA”. Which means every homeowner gets a fantastic tree rooted in the terrace in front of their house. I don’t have a problem with trees. I actually am a huge fan. But it’s just that the city doesn’t take care of them. The wait-list is a few years long if you want someone to come out and trim them back (and I don’t have a cherry picker to do it myself). The root system breaks up the sidewalks, and messes up underground pipes and such. The shade of mature trees doesn’t allow our roof to dry properly after it rains. And, oh yeah.

DSC_0130

The branches break off and hit our house. It’s not a ridiculous amount of damage, but enough that we wanted to contact the insurance company to see if there were any unseen casualties. The adjuster who came out declared that our roof needed replacing… on one side. And one side only. The front side. They are giving us half of a roof. I don’t want to seem ungrateful here… but I have never heard of this. The shingles are pretty old… it’s not like they are going to match them up to anything you can buy in the store. Half a roof is sort of an embarrassing idea to me. And I REALLY don’t want to shell out two deductibles if in 6 months the backside gets demolished by another branch. Am I out of line?

DSC_0155

DSC_0157

DSC_0158

Okay. Whine-fest over. We chopped up the branch and set it on the curb. Here’s a shot of the offending tree that got all aggressive and tossed a branch at our house:

DSC_0136

Do you like how I personify everything?

DSC_0160

Here’s the back of the house. We had to do some re-grading and while we were at it, we took the opportunity to throw in some boxwoods. I love that plant. After we raked the dirt smooth and sloped away from the foundation, it was time to add the eye candy.

DSC_0163

We actually picked these up about a month ago and have been keeping them watered and taken care of. I have been meticulously perusing the boxwood sections of landscaping stores all summer, and have been really disappointed with pricing. BUT THEN we happened to walk through the gardening section of Home Depot and they had a 50% off sign near the boxwoods. They were only one gallon bushes, but I was psyched. Psyched enough to grab 8, and then later come back for 2 more. We managed to snag them for $3.50 apiece. Which means a grand total of $35 for one long row of boxwoods in my backyard.

DSC_0167

DSC_0171

We spaced them out according to the instructions on the card attached to them (these required 36″ of what you might call “breathing room”). When we had them how we wanted them, I took my shovel and dug some holes.

DSC_0184

And then de-potted them…

DSC_0191

And then packed soil around them.

DSC_0199

Afterwards, we got about 8 bags of a dark mulch to cover up the dirt and some decorative looking bricks. I still have to level them out, and am considering mortaring them together, but that might be next year. Sorry for the night shot, I just grabbed the camera and snapped a pic about 10 minutes ago. Teehee!

DSC_0258

I’m hoping they hedge together and we can try to shape them at some point. I realize we will have to be patient…. like a few years patient. But I’m really happy with the improvement. Another reason for the upgrade is that we plan on removing that exterior back door pictured above and replace it with a window (probably the size of the far right one). We will have to have a mason come out and match up the stone as close as possible, but I’m pretty confident that it will look kind of patchy. SO, I’m thinking that mature boxwood will cover up any weird seamless-ness that the change will cause. Hopefully. What updates are you guys doing? Any end-of-season deals that you’ve seen? Tell me about it!

Something for Nothing

I know that I briefly brushed on the fact that I’m really into graphic design. It got me thinking that I’d love to incorporate that here more. That means good things for you awesome people that are reading. Hold on for some FREE stuff!

Blessed

This is one of my favorite verses from the sermon on the mount (Matthew chapters 5, 6 and 7). Blessed are the pure of heart, for they will see God. Here’s a closer snapshot of it.

PreviewBlessed

I didn’t realize how much went into a little bit of text and font. So much tweaking! Good practice though, because I’d like to keep these freebies coming. At the bottom of this post, you’ll find three different files for download. I made this image in yellow, red and black.

Cutting

Cutting2

When you print the PDF file onto 8.5″ x 11″ paper, it will have crop marks that you can use to chop this print down to a final size of 5″ x 7″. Perfect for frames! I use a cutting “machine” that I found in the scrapbook department of Hobby Lobby for about $7 a few years ago. If you have steady hands, I’m sure a scissors would work just fine too.

Yellow

Red

Black

Click on a color file that you think would work best in your home and COMMENT to tell me where you’re going to use it!